
Your Custom Text Here
VR Combat Sound Design & Wwise Implementation — Case Study
Combat in Reave is physics-driven and player-controlled, meaning every swing, clash and impact must feel immediate and grounded. Because the player’s physical movement directly drives combat, the audio needed to reinforce weight, speed and contact precision without becoming repetitive or overwhelming in VR.
Challenges:
Variable swing speeds
Physics-based hit detection
Multiple surface types
Avoiding repetition fatigue
Maintaining clarity in 3D space
Performance constraints in VR
System Design in Wwise
Velocity-Driven Swing System
Each melee weapon’s swing intensity was driven by an RTPC mapped to weapon velocity, allowing audio layers to scale and trigger dynamically.
Higher-velocity swings introduced assets with sharper transients and additional high-frequency detail to reinforce perceived force. Medium swings triggered softer variants, while low-velocity movements produced no swing audio — preventing unnecessary noise during subtle weapon handling.
This ensured that audio feedback directly reflected player intent, strengthening physical embodiment within VR.
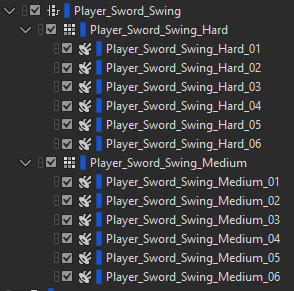
Wwise setup of the Switch Container containing the assets for two different swing strengths: Hard & Medium
Impact Triggering & Material Switching
Impacts were designed as layered, bespoke recordings and triggered as singular events.
Surface-based switch containers provided material-specific variation across seven distinct surface types. Random containers were used to reduce repetition during extended combat encounters.
In addition to surface type, impact intensity was categorised as soft, medium or hard. Rather than scaling a single asset via RTPCs, I recorded distinct impact recordings at each velocity level. Metal objects resonate and respond differently depending on strike force, and capturing those behaviors authentically produced significantly more convincing results.
Although this approach required extensive original recording, it introduced a level of physicality and realism that procedural scaling alone could not achieve.
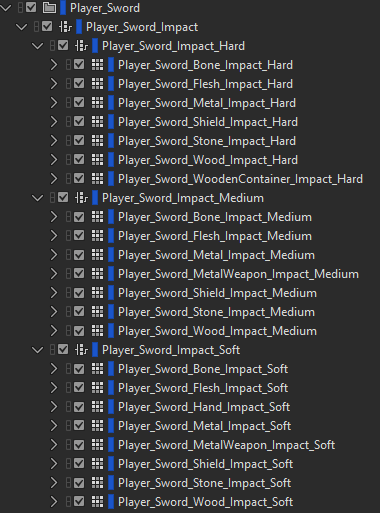
The Wwise Switch container with all the assets for 3 Impact Strengths: Soft, Medium & Hard. Across 7 different surface types.
VR Considerations
In VR, spatial clarity and mix definition are essential.
Voice limiting and prioritization ensured that critical combat feedback remained intelligible, even during multi-enemy encounters typical of Reave’s extraction gameplay. Standard mix-ducking techniques were implemented to preserve weapon presence while maintaining overall scene clarity.
The system was built to remain responsive without contributing to fatigue or audio clutter — a key consideration in extended VR sessions, where user comfort always has to be taken into account.
Why It Was Designed This Way
The goal of this system was to maximize weapon responsiveness and reinforce the physicality of VR combat.
By mapping swing velocity directly to audio behavior and capturing distinct impact recordings across multiple intensity levels, the system responds naturally to player input. This strengthens immersion and ensures that combat feels weighty and responsive rather than just cosmetic.
The structure was also designed to be scalable, allowing consistent behavior across multiple weapon types while maintaining performance stability within VR.
If you’re looking for an experienced freelance game sound designer to design and implement scalable audio systems, feel free to get in touch.

Sound Design for VR Games: Challenges and Solutions
Spatial audio is a crucial component in creating an immersive environment for VR games. Get the spatial audio right and players will feel completely immersed in the VR space. But get it wrong, and it could take players out of the experience altogether. Or, even worse, could make the user feel uncomfortable and want to take off their headset.

Sound design plays a pivotal role in VR games in helping immerse players within the experience. Alongside playing important gameplay roles such as providing audio feedback cues for interactions and guiding users through the virtual space. The all-encompassing nature of VR poses some unique challenges for an audio designer, in addition to all the familiar challenges of designing and implementing audio for games.
Now that I’m working on my second VR title as a sound designer, I have gained some insights into these challenges and some possible solutions for them. This is not a definitive list by any means, but the challenges listed here have proved to be common across the VR games I’ve worked on. The solutions are also not prescriptive, just some approaches that have worked for me.
Challenge 1: Spatial Audio and 3D Sound Positioning
Spatial audio is a crucial component in creating an immersive environment for VR games. Get the spatial audio right and players will feel completely immersed in the VR space. But get it wrong, and it could take players out of the experience altogether. Or, even worse, could make the user feel uncomfortable and want to take off their headset. VR games have the unique consideration of the end user's comfortability. More of which I’ll go into further detail later on in the article.
Because VR games completely encompass the player with sight and sound the audio has to be spatially accurate. Players can walk right up to sound emitters and interact with them in a 3D space, while feeling like they are actually there. Therefore they will instinctively know if something feels off with the audio, even if they might not be able to articulate what it might be.
So setting the attenuations, reverbs and occlusions in a VR game have to be done with great care and accuracy. It’s difficult to overstate the importance of this, especially if you haven’t experienced VR firsthand before.
Solution: Audio Middleware and using their Advanced Algorithms
One of the most powerful solutions to these spatial audio challenges is by using audio middleware, such as Wwise or Fmod. Their advanced spatial audio capabilities and algorithms can make it much easier to deploy convincing spatial audio than using a game engine’s default audio system.
As one example, Obstruction and Occlusion are terms used when a sound emitter is blocked or partially blocked by a game object. Such as when a wall is between a sound source and the audio listener.
Obstruction and Occlusion can be quite complex to set up and involve many complex calculations. But by using audio middleware like Wwise, and utilizing its rooms and portals system, it can make it much more straightforward to implement. It will handle a lot of the complex calculations in real time, without the need for a lot of programming resources to get it set up and running.
In addition, the reverb options available within Middleware can be more flexible and powerful than the reverbs that come with game engines. Allowing the sound designer to fine tune the acoustic profile of spaces in VR much easier and with greater precision.
Trying to replicate all of the spatial audio features available in audio middleware inside a game engine's stock audio system would likely be very time consuming and would require a significant amount of engineering and programming resources to set up.
Challenge 2: User Comfort and Avoiding Motion Sickness
VR games have the somewhat unique challenge of having to be aware of the end user's comfortability and susceptibility to motion sickness while playing. While it is doubtful that audio will directly contribute to motion sickness, inconsistent audio cues and mismatched audio-visual stimuli will have much more of a negative effect in VR than they would in a non-VR game.
So it is essential to consider user comfort while designing audio for VR games. Even among experienced VR users, there are still a large number of people who can only play VR games for short stretches of time at once. Therefore, being mindful of this susceptibility to discomfort during our audio design process will ensure that we are not contributing to any feelings of discomfort or unease for players while they are playing our game.
Maintaining consistent audio cues that match interactions and visual cues are very important in VR titles. VR games typically offer lots of physics interactions that the player can engage in, above and beyond what would be typically found in most flat-screen games.
From touching and picking up objects with their hands, swinging weapons that are velocity-mapped to their physical swing, to the handling of firearms that have real real-world based loading mechanisms. Which means that you often have to manually reload your weapon in exactly the same way you would their real-life counterparts - whereas in non-VR games you typically reload your weapon with the click of a button.
Solution: Consistent Audio Cues and User Testing
One solution to consistent audio cues might mean recording more of your own original sounds. I have often found that commercial sound libraries do not always contain the sounds I need when working on VR games. The added interactive element of VR games often means that I can’t find the performances that I’m looking for in sound libraries. Either because not enough variations are provided, or a particular object and surface combination has not been included or because an action is typically not available in non-VR games - so there hasn’t been a demand to provide these recordings in sound libraries. One example of this is dragging melee weapons across different surfaces in VR games. Often, melee weapon sound libraries do not provide these types of recordings and if they do, they might only be for one surface type.
Another solution is by being mindful that we do not create any harsh or fatiguing sounds in our audio design as it is doubly important in VR that no audio contributes to a feeling of discomfort or uneasiness with players because of the hyper sensitive nature of VR as a platform.
The most powerful way we can ensure that our audio cues match interactions and that we are not contributing to any feelings of discomfort is by extensive user testing. User testing is a valuable and necessary part of all game development. As sound designers, we are likely not going to be testing in the headset as often as we’d like. Time spent recording, in our DAW and then perhaps in middleware doing implementation, means that we often have limited time testing in the headset. So a sound that might sound totally harmless after some preliminary testing by us, might become fatiguing or uncomfortable to listen to after many hours of play time. Something that only extensive user testing will bring to light. Which we then can act upon.
Challenge 3: Balancing Sound Quality and Performance
A large majority of the VR gaming market are playing on standalone headsets, like the Meta Quest. Standalone headsets, while very impressive in what they can achieve, are not as powerful as current generation game consoles or anywhere near high end PCs in their power and performance. Therefore, there is often going to be a delicate balancing act between quality and performance.
For audio this means that resources will have to be managed carefully. Which will have bearings on how we compress the game’s audio assets and the quality and amount of real time audio processes we can use. That will impact things like the quality of in-game reverbs, for example.
Solution: Efficient Audio Asset Management
Efficiently managing your audio assets and sound systems is key. Like choosing audio compression settings that find a balance between sound quality and size footprint for your assets.
Another solution might also mean reusing assets wherever you can. If you have some common actions in the game, is it possible that they can share the same set of sounds? Knowing this beforehand will help, as it will influence the design phase of the sounds if you know that they have to be suitable for multiple sets of game actions.
Baking-in reverb to some assets might be a more efficient way to handle reverb in some specific situations. This is frequently done on gunshot tails, for example, and a system will switch out the tail to reflect the environment the gun was fired in - like a small or large room or outdoor space.
Baking-in reverb can often mean higher quality reverb, as the quality and amount of reverb plugins available in our DAW’s are more numerous and powerful than those ordinarily available in game engines or audio middleware.
But this can’t be done for everything. At some point you will have to rely on in-game reverb. Then you will have to walk a fine line between the quality of the sound of that reverb versus the system resources that it uses. One good approach to this is being mindful of areas where you can get away with lower quality reverbs (perhaps in a space that the player only passes through briefly) so that you have the bandwidth for higher quality reverbs in more important areas of the game.
Conclusion: Sound Design in VR and AR Games
I hope I’ve shown that sound design plays an important role in VR games in fully immersing players in the virtual space. But it also comes with a unique set of challenges that sound designers for VR games must contend with: accurate spatial audio, a marriage of audio and visual stimuli, minimizing player discomfort and being aware of the technical challenges and limitations of VR hardware are all important things to consider.
But with attentive consideration of these challenges and employing solutions such as audio middleware and extensive user testing, your audio will greatly contribute to making your VR game feel immersive and great to play.
Do you need an experienced sound designer for your VR game? Get in touch and tell me about your project today!
The Author
This article was written by Oliver Smith. A long-time remote working freelance sound designer dedicated to making gameplay enhancing sound for games.
Why Integrating Sound Design Early in Game Development is Essential
When defining the role of sound in your video game, it is important to define early on sound design’s primary functions within your game. Is it enhancing immersion? Guiding players? Providing feedback? Increasing player’s awareness? Making the player feel powerful? Setting the emotional tone of the experience?
Sound has the ability to do all of these things and more.
The Importance of Early Sound Design Integration
In game development sound can play a crucial part in making a player feel immersed and emotionally engaged in an experience. It provides vital cues to guide and lead the player. It delivers tangible feedback to players when they are performing actions within the game. It can reinforce success or failures. It grounds them in your world, within the ups and downs of your narrative. It supports nearly every facet of your game.
There is no doubt that early integration of sound design within the game development process will lead to a more cohesive and polished final product. Bringing on sound design early allows a long term collaboration with the rest of your game’s team. Giving time to prototype, experiment and grow the audio pipeline alongside every other discipline in the development process.
Sometimes sound design in games is treated as a post-production process. Where sound is brought on as one of the last disciplines in the pipeline. This can result in less time for prototyping, iteration and experimentation. As well as less time to catch and fix unintended bugs and performance related issues. Resulting in a situation where audio isn’t as tightly integrated as it could be, and the game is not fully making the most of what sound design can bring to a game experience.
I can’t think of a single instance where bringing on sound design as early as possible wouldn’t result in a better sounding game and more importantly, a better final experience for the players.
Defining the Role of Sound in Your Game
When defining the role of sound in your video game, it is important to define early on sound design’s primary functions within your game. Is it enhancing immersion? Guiding players? Providing feedback? Increasing player’s awareness? Making the player feel powerful? Setting the emotional tone of the experience?
Sound has the ability to do all of these things and more. Defining which areas are most critical for your game early on will help make it easier for your sound team to focus on and plan their approach from the get go.
Is your game light hearted and cartoony in style? Chances are you’d want playful audio that supports and reinforces that aesthetic, with sound design that can delight and ease player’s into the experience.
Is your game a realistic military simulator? Then we’d likely expect gritty and grounded audio, with firearm-accurate sounding weapons. Where each bullet ricochet can help guide players to pinpoint exactly where they are being attacked from, and by which weapon.
Each of these games will have vastly different requirements and goals for their sound design.
Early Prototyping and Sound Experimentation
There are numerous benefits to early prototyping and experimenting when it comes to sound - as there are when prototyping any feature in the game development process. Getting some placeholder sounds up and running within the game as soon as possible can be extremely valuable and a time saver in the long run.
For example, if your game has characters that can walk or run, it is likely that there are also going to be different surfaces that they can walk or run on. Implementing a quick test environment with different ground surfaces set up can allow the sound designer to test this feature and fine tune the implementation of it before it impacts the larger project as a whole. Once this system has been perfected, it can be utilized and scaled for all the characters in the game.
Continuing from the above example, let's say that this game also has enemy NPCs that patrol until alerted by the player. It might be prudent to test the attenuation of the enemies’ footsteps so that the player has clear audio cues about where the NPC is located, even if they can’t see them. Good time to prototype this particular attenuation, but also how attenuations in general are going to be handled in the game.
These are just simple examples, but I hope I’ve got across the idea that prototyping audio in small, controlled stages will allow it to be fine tuned and perfected so that it can be brought over and scaled to the larger project with minimal hiccups.
Sound Design’s Influence on Game Mechanics
Sound design can directly shape and influence gameplay mechanics. For example, audio can help with environment navigation and puzzle problem solving. Some games have specific audio cues that hint at the presence of a hidden object or a clue to a puzzle. Implementing such audio cues in this case would allow the game designers more options when designing puzzles, knowing that they can utilize audio cues in guiding the player to complete a puzzle.
Audio cues can be a powerful way to reinforce some of your game's core mechanics. One of the main mechanics in the Dark Souls series, for example, is the parry. Where if the player times it correctly, they can avoid all of the damage of an attack with a parry. A successful parry is accompanied by a noticeable audible cue to inform the player that they have successfully performed that action. They then can adjust their strategy on the fly, knowing that they have an opening to go on the offensive.
Audio can provide clear status indicators, with sound signals like the sound of a heartbeat and increased breathing to communicate a player's health status being low. Using audio for cues like these means that the player doesn’t have to rely solely on visual cues, freeing up their attention for other aspects of the game.
These are just a few examples where audio can be used to shape and integrate with core gameplay mechanics that will enhance gameplay.
Creating an Audio Style Guide
An audio style guide helps maintain consistency in sound design throughout the game development process. It can provide direction and clarity to the sound design of the game. A style guide can also be an important resource to show a new team member that joins the project further along on its development cycle, helping them get up and running quicker.
A sound style guide could contain things like: sound palette, audio plugin chains, technical delivery specifications and audio references from other media.
Having an audio style guide in place can streamline the sound creation process as well as maintaining a sonic consistency throughout all stages of the game’s development cycle.
Technical Considerations and Early Integration
It’s very important to plan for audio integration within the game development process as early as possible. By asking questions such as: are you going to use your game engine’s default audio system? Are you going to use audio middleware and if so which one? Whichever option you choose, how well will it interface and scale with your game as it grows in scope and complexity?
Knowing the technical needs of the audio in your game will help determine what would be a good fit for your project. If you are making a relatively simple 2d platforming game in Unity, Unity’s default audio system might be more than enough for your audio needs. But if you’re making a large open world game, with lots of complex systems and requiring multiple sound designers, perhaps using audio middleware would be a better solution.
The Long-Term Benefits of Early Sound Design Integration
The advantages of integrating sound design early into the game development process are numerous. The audio team gets to iterate and grow alongside your game’s other systems, resulting in a tight final integration that will benefit gameplay and the final product immensely.
The audio will also have been tailored from the get go to match the emotional, aesthetic and gameplay goals of your game. Making for a more compelling and emotionally impactful experience.
On a technical level, it will also result in there being fewer audio issues and bugs as you get closer to launch. As audio will have had the time it needed in the oven to test, investigate and fix problematic issues earlier in the development cycle.
I would encourage more game developers to view sound design (and audio in general) as a core component of the development process from the outset. Treating it as such will result in a markedly improved final product.
Do you need a freelance sound designer for your game? Get in touch and tell me about your project today!
The Author
This article was written by Oliver Smith. A long-time remote working freelance sound designer dedicated to making gameplay enhancing sound for games.

My Favourite Noise Reduction Plugins for Sound Design
A common mistake beginning sound designers make - and I was certainly no exception to this, is using too many noisy source elements in the construction of their sound effects. Or not taming that noise adequately enough.
A common mistake beginning sound designers make - and I was certainly no exception to this, is using too many noisy source elements in the construction of their sound effects. Or not taming that noise adequately enough. Which can often lead to a build up of high frequency content that can be fatiguing and unpleasant to listen to. Even piercing in some cases. Not something that’s desirable for a game audio assets that players may listen to multiple times in a play session. A harsh sounding gunshot would soon get tiresome to listen to over and over again.
Using noise reduction plugins can be a simple way to mitigate this problem. They are typically easy to use and don’t have many controls to bog you down with. Usually just separate frequency bands that you can adjust the focus for the noise reduction taking place.
As well as providing noise reduction, they can also serve a useful role in sound design beyond just typical clean up purposes. Using heavy noise reduction on a sound can have a dramatic effect on that sound. Taken to its extremes, you can often only be left with the tonal components of a sound. Which can quickly turn a naturally recorded sound into something that sounds synthetic. A process that can be very fruitful for Sci-Fi, Glitch and more abstract sound design.
Here are some of my favorite noise reduction plugins that I use daily as a freelance sound designer. While they all do a similar thing, they each have their own characteristic sound when driven hard.
RX Voice De-Noise

Probably one of the more well known noise reduction plugins out there, as RX’s primary function is for audio cleanup and repair. Voice De-Noise is quick and simple to use and it’s the plugin I’ll turn to when I need some quick and painless noise reduction. Maybe you have some source you really like, but it’s just a bit too noisy and unpleasant in the upper frequencies. Such as an explosion, for example. Voice de-noise will clean it up effortlessly so that it’s ready for further creative processing. Now you won’t have to worry about those piercing highs.
Melda RatioMB

MRatio is the plugin I’m more likely to turn to for when I want to push the noise reduction really hard, rather than just simple noise clean up. Although it excels in that regard too.
To push MRation hard so that you’re only left with the tonal content of a sound, click on the Noise/Tonal option on the left hand bar when you open the plugin. You will then see the interface as it appears in the image above. There is a Noise band and a Tonal band. To drive it hard and remove all the noise from a sound, turn the Noise ratio knob all the way to the right so that it’s at 100%.
Doing this can lead to some very synthetic sounding results. Sometimes with artifacts that can actually be useful for some forms of design, like SciFi style content.
Or if you want a more subtle effect, drive it less.
Waves WNS

Much like RX Voice de-noise, this is another noise reduction plugin whose primary purpose is stated as a dialog noise suppressor. It’s an adaptive noise suppressor that aims to reduce the noise of a dialogue recording while highlighting the frequencies of the voice itself. This isn’t the plugin for surgical noise reduction. I use it more for gentle taming. It has a 6-band dynamic EQ engine that you can adjust according to the frequency content of the input signal.
I sometimes like to use this on layered sound effects to tame some of the noise buildup that can be present when you stack multiple processed layers together.
Waves Z-Noise

An oldie and a classic. Probably not best in class, but it can provide some interesting artifacts when driven really hard. Which, like Melda RatioMB can be great for more abstract and futuristic sound design.
Bertom Denoiser Classic

What I like about this one is that it has zero latency and super low CPU usage. Perhaps the lowest CPU usage out of all the plugins here. Like Waves WNS, this also has 6 bands that you can attenuate how you like depending on the source material. Because this plugin hasn’t been specifically created for dialogue noise reduction, I feel that I often get nicer results on using this on sound effects as opposed to WNS.
Best of all, this plugin is free. So why not grab it from Bertom Audio’s website.
The key is not to overwhelm yourself with numerous plugins but to ensure you have at least one reliable noise reduction plugin in your asernal. Consider adding Melda RatioMB and Bertom Denoiser Classic - both free options, to your collection if you haven’t already.
In conclusion, as a freelance sound designer, incorporating noise reduction plugins into your workflow can significantly enhance the quality of your game audio assets. Whether it's cleaning up noisy elements or pushing the boundaries for creative sound design, these tools are indispensable in our arsenal.
Do you need a freelance sound designer for your next game? Get in touch and tell me about your project today!
The Author
This article was written by Oliver Smith. A long-time remote working freelance sound designer dedicated to making gameplay enhancing sound for games.

The Best Free Plugins for Sound Design
These are some of my favourite free plugins that I use daily as a freelance sound designer for video games.
These are some of my Favourite Free Audio Plugins that I use daily for As A Freelance Sound Designer for Video Games.
Melda Free FX Bundle

Melda’s Free Bundle is a massive collection of high quality bread and butter sound effects. Including everything from: Reverbs, Eq, Compressors, Saturation, Ring Modulation and many more. This is a great collection to grab, especially if you’re just starting out and don’t have many plugins at the moment. Melda plugins are very high quality and can take you a long way when it comes to sound design.
Kilohearts Essentials

Kilohearts Essentials is another huge free bundle of effects. There’s some overlap with the Melda Bundle, but there’s enough uniquness in each bundle to make them both well worth getting. Kilohearst plugins have a clean user interface that makes them really easy to use. They sound fantastic as well. I use these all the time; there’s almost always at least one Kilohearts plugin in my plugin chains. Between this and the Melda bundle, that’s a great collection of sound effects to get started with.
All Pass Phase

All Pass Phase. Disperser became an extremely popular plugin for sound design over the past few years. This does the same thing. And it's free. Use sparingly for modern, liquidy transients. Great for SciFi sound design. Although I wouldn’t use if for more grounded, realistic sound design though. It can give sounds a synthetic quailty when oversused or pushed too hard. Which is sometimes what you need and sometimes isn’t.
Doppler Dome

Doppler Dome. As sound designers, we frequently have to make lots of whooshes and pass-by sounds. A doppler plugin can greatly speed up this process. Doppler Dome is easy to use and can yield great results within seconds. Grab it.
Valhalla Supermassive

Valhalla Super Massive. Great for huge reverbs. It can also be used more creativley. I like to modulate its parameters to generate whooshes and creative delay effects. A very versatile and powerful plugin that can take a while to explore the limits of. It’s amazing that it’s free.
Valhalla Space Modulator
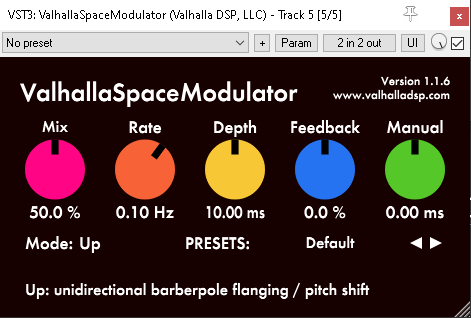
Another great freebie from Valhalla, Space Modulator is a deceptively simple, but very powerful plugin. It’s essentially a flanger. But things can get weird pretty quickly by driving and modulating it’s controls. I like to use a few of these in serial for tonal, magic sound design or to push it further for warbly SciFi sound design.
Vital

Looking for a free alternative to Serum? Look no further because Vital is just as powerful. Clearly laid out and easy to use it’s fantastic for SciFi sound design. There are also lots of free wavetables avalaible for it if you do some searching. A power house synth.
Paul Stretch

Need to stretch your sounds a few hundred times? Great, because Paul Stretch has a VST plugin version. Great for making long ambiences out of unusual source material. Try running random sounds through it for unexpected results.
Do you need an experienced freelance sound designer for your game? Get in touch today and tell me what you’re working on!
The Author
This article was written by Oliver Smith. A long-time remote working freelance sound designer dedicated to making gameplay enhancing sound for games.

Serum Tutorial: How to Use Serum as an Envelope Generator for Sound Design
Serum is widely known among the sound design and game audio community as a powerful software synthesizer. But maybe less known is the fact that it can also be used as an effect insert.
How to use Serum to make Impacts and Whooshes for Sound Design
Serum is widely known among the sound design and game audio community as a powerful software synthesizer. But maybe less known is the fact that it can also be used as an effect insert.
When using Serum as an effect insert, you can route audio from your DAW through Serum and use its filters, effects and modulation capabilities to process the sound. While this is powerful in its own right, one of the things I like to use it for is as an envelope generator to sculpt sounds.
Using it in this way allows you to generate transients or impacts from source material that may not have a strong transient component. Or you could use it to generate whooshes, something that we have to do in sound design frequently. SerumFX enables this quickly and easily - especially after you’ve created and saved some envelope presets that you like. I used this technique recently to generate whooshes while designing spell casting sounds for enemy mobs in Wolcen: Lord of Mayhem’s Endgame update.
Before we start, if you already own Serum, check to see if you’ve downloaded SerumFX. I didn’t know about it for a while because it has its own separate downloader and installer. So make sure to grab it from the Xfer website if you haven’t already.
In order to send audio through SerumFX you need to enable it via the Noise Oscillator and select: Audio In. Then what I typically like to do is to use either an Envelope or an LFO to control the level of the Noise Oscillator - which will enable us to shape the envelope of whatever signal we’re passing through Serum.
Setting up a Whoosh Envelope in SerumFX
For example, if we were setting up a whoosh envelope, we’d probably want a slow attack, a short sustain time and a medium to long decay time. But obviously you can set your envelope to achieve whatever results that you’re looking for.

A simple seteup for generating whooshes in SerumFX. Here I have used FFO 1 to shape the envelope which controls the level of the Audio Input.
As well as generating more basic envelope shapes such as impacts and whooshes, you can also use it to generate wild tremolo or rhythmic style effects that would be laborious or difficult to create with other plugins. Because Serum has four Envelopes, four LFO’s as well as its Chaos Oscillators, you can modulate far more parameters than you would be able to on a conventional tremolo effect plugin, for example.
Taking Envelope Generation Further with Serum Effects
Once you’ve dialed in the envelope shape that you want, you can take it even further. If I’ve set up an impact-shaped envelope, another thing I like to do is to engage the Sub oscillator and map the same envelope from the Audio In to the Sub oscillator. This will help add some low end content to our impacts. Or, if I’m making whooshes I might engage the reverb effect and map some of its parameters to the whoosh envelope that I’m using. Of course you’re free to use any and all of Serum’s effects to shape your sound further. The filters in particular can really help further refine your sound.

An example of a transient envelope in SerumFX. This time the amplitude envelope is also mapped to the sub oscillator to add some low end content to our sound.
I hope this was informative. While there are definitely more advanced (and pricey) envelope generators out there for sound design, the fact that many people own Serum already can make it a great option if you don’t have access to anything else. I hope it’s given you some ideas to try at least. Try using SerumFX as an envelope generator or maybe even just using its onboard effects to process sounds. Have fun!
The Author
This article was written by Oliver Smith. A long-time remote working freelance sound designer dedicated to making gameplay enhancing sound for games.
Sound Design for an ARPG - Wolcen: Lords of Mayhem
I wanted to share a bit about my process of designing and implementing sounds for mobs in an Action Role Playing Game (ARPG) like Wolcen: Lords of Mayhem.
Sound Design for an Action Role Playing Game
As a freelance sound designer, I had lots of fun working on Wolcen’s Act IV. A significant portion of my work was designing and implementing sounds for 15 brand new enemy mobs. I was also trusted with designing the audio for the final boss of the game. So I wanted to share a little about my process of designing and implementing sounds for mobs for an Action Role Playing Game (ARPG) like Wolcen: Lords of Mayhem.
Mob Categories
Mobs in Wolcen are typically divided into two categories: trash mobs and elite mobs. Trash mobs are the weakest enemies in the game. They are not very threatening by themselves but often appear in large numbers. Which has a bearing on sound design decisions, which I’ll discuss in more depth further on. These mobs are essentially canon fodder. The player can often obliterate whole swathes of these enemies with little effort. Therefore their sounds needed to be approached in a way that would convey and acknowledge these factors. Generally, I’d make sounds of a short duration without long tails. Because they spawn in such large numbers, the frequency of their attacks in groups can be considerable. It was therefore important to make their sounds short and to the point.
Elite mobs, on the other hand, are more impressive, physically larger and more threatening to the player. They appear in smaller numbers, but have more elaborate visual effects on their attacks and abilities and do more damage. The sounds for the elite enemies therefore needed to be more impressive to match their stature. Because of this I could make sounds for the elite mobs more imposing, detailed and with longer tails. They could take up more sonic space.

An example of an elite mob attack - the large circular fire explosion
Pre-Attack Sounds
Pre-attack sounds usually are triggered at the start of an attack’s animation. Trash mobs usually don’t have a pre-attack sound. Their attacks are commonly low damage and therefore low priority for the player. As they are not normally a serious threat to the player, pre-attack sounds for them would be redundant and clog up the audio mix space that could better be saved for more important audio cues.
Such as Elite mob’s pre-attack sounds, for example. Most of the elite mobs that I worked on have a pre-attack sound. Because they are much more threatening than trash mobs, it provides a useful audible warning indicator to the player when they are about to launch an attack. Which can give them time to avoid the attack by dodging or using a defensive ability. In essence, it gives the player a chance to respond to the attack by listening to the audio cue.
Imparting Identity and Lore with Sound

Concept Art for two of the mobs I worked on: The Spectre Mage and the Republic Golgoth Flamethrower
In addition to informing the player of imminent attacks, the sound design of the mobs could also impart a lot of their characteristics and lore to the player. Wolcen’s world and story has a lot of lore behind it, which plays a big part of the game. Nearly all mobs in Wolcen are grouped into different in-world game factions. The lore behind these factions helped guide the direction for their sonic palettes.
Republic mobs tend to have good equipment and are technologically advanced compared to other factions. I emphasized this by using lots of mechanical and electrical sounds that power some of their weapons and armored suits. Some of the weapons they wield include rifles, gatling guns and flamethrowers.
The Cult of Souls are an undead faction made up of various skeletons and specters. Many of their skills are based around frost, ice and soul magic. Including frost and ice in their precast sounds would therefore help indicate to the player what kind of elemental attack would be heading their way. If they were hit by one of these frost attacks they would potentially be frozen for a short duration. I also recorded my voice to create breathy sounds that were used as building block elements for their soul magic attacks.

One of my Reaper sessions for a Cult of Souls Mob - The Soul Casket
I also tried to utilize sound to inform the player about the quality of a particular mob’s weapons and equipment. For example, the Spectre Lancer was wielding a very flimsy looking spear. So I made sure my sound design conveyed this by choosing rougher, blunter metal sounds and not using smooth, resonant shing sounds - which tend to convey sharp, well kept blades.
Audio Implementation with Wwise and CryEngine
During implementation it was very important to limit the voices of mob attacks and skills that had a high rate of fire. Not doing this could lead to machine gun-like effects of certain sounds triggering repeatedly during gameplay. Which is extremely undesirable. Becoming not only annoying for the player to listen to, but clogging up the audio mix in an undesirable manner and potentially masking other important game audio.
Creating variations of the mob attacks and skills was important. I strived to create variations that walked the line of being different enough to avoid the repetitive nature of a frequently cast attack or skill, but not being so different that the player could still identify each attack or skill from the familiar sound that it made. Generally speaking, trash mobs had more variations than elite mobs because of their faster rate of attacking.
The general process of implementation went like this. Firstly, I’d set up my sounds in Wwise. Paying careful attention to the randomisation parameters, attenuations and limiting of voices. Audio levels were roughly set at this stage. The final mixing of these would come later. After I had a chance to test my sounds in the game and iterate upon them until we were happy with them.
Next, using the Cryengine Audio editor, I would create audio events and link these events to the ones I had created in Wwise. Put simply, the CryEngine audio event called to the corresponding Wwise event.
Once these events were set up, implementation in CryEngine usually happened via one of three ways. The first, and most straightforward, was putting the events trigger for my sounds in the XML file of a particular mob. Each mob had an XML file that determined most of their game data.
There are many predefined ways to trigger a sound using this method, like OnAnimStart (which would trigger a sound at the start of an animation) and OnAnimCast (which would trigger a sound on the ‘cast’ portion of a particular skill or projectile). I believe these, and other parameters were created internally for Wolcen for the audio functionality we required.
The second way I implemented mob sounds was attaching a sound directly to an animation using CryEngine’s Animation Events. This was sometimes necessary to do when precise timing was required or when the XML method was not meeting our requirements for one reason or another. Implementing in this way allows you to scrub through an animation frame by frame and attach a sound precisely where you want it to trigger. I used this method quite a lot. It allowed a lot of flexibility in attaching sounds on a very granular level which increased the detail I could achieve. This was particularly helpful for elite mobs which had elaborate, extensive and multipart skills.
The third main way I implemented sounds was via particle effects. This allowed me to attach my sounds directly to the particle effects used by a mob’s attack or ability. A sound could be triggered by any of the layers in a particle effect, allowing for fine control over sound. For example, I could attach a fire sound directly to the fire layer in the visual effects. Which would allow for precise control over that sound’s triggering and duration. We might want a fire sound to fizzle out when the fire dies, yet there are still visual effects for smoke for example. This would ensure that our fire sound stops once the fire visual effect has been destroyed. This method of implementation was often used for the damaging portion of a skill - when a mob’s skill hits the player character directly.
Sometimes, there came a situation where none of those methods of implementation would suffice. Sometimes I would come across a situation which would require programmer support. This was the case for the Electric Fences created by one of the Republic Golgoth’s Flamerthrower abilities. This skill created a new game object in the world - an electric fence that could entrap the player. Because this skill created a new entity without an XML file, or other parameters I could easily modify, I had to work with a programmer to implement my sounds directly via code. This was quite a rare occasion though.
I had a great time working on the mobs for Wolcen’s Act IV. Because I had such control over the implementation of my sounds, it really made me think about implementation first. Which informed how I approached my designs before I even started them. I also got intimately familiar with how implementing audio works with CryEngine.
Do you need an experienced sound designer for your next RPG or action game? Get in touch and tell me about your project today!
The Author
This article was written by Oliver Smith. A long-time remote working freelance sound designer dedicated to making gameplay enhancing sound for games.

Unreal Engine Audio Implementation Demo: Soul City
The goal of this project was to start to learn how to implement audio inside the Unreal Engine. I specifically didn’t want to use middleware for this, so I could get a handle on Unreal’s native audio tools without relying on the familiarity of using something like Wwise. I also wanted to get to grips with Blueprints and see how I could apply them to some of the audio systems.
The level I used for this showcase was the free Soul City project from Epic Games.
All of the audio was designed and exported for implementation using Reaper.
I’m documenting this mainly as a reference for myself. But if it aids anyone else that would be great.

Planning
After opening the project for the first time, the first thing that I did was to play through the scene a few times to get a feel for what kinds of sounds the environment would require.
As the project already contained audio, this was pretty easy for the most part. But I also spotted some areas where I thought I could add some more detail and make it my own - rather than just copying what the sound designers had done in the original project.
As rain is such a predominant part of the scene, I wanted to add as much detail as I could with it. I made a note of the different surfaces the rain was falling on, like the tarpaulin and the corrugated iron roofs and planned to add emitters for both of these surfaces.
There was also an abundance of neon signs placed around the level, so I could add a gentle hum to these. One was even flickering near the end of the scene, so I wanted to add a unique sound for that one.
I also aimed to add a bit of extra life to the scene. I had the idea to add a dog barking when you walked close to one of the apartments in the level. It would help to give the impression that this was an area that was lived in.
Some of the other elements in the level that would require sounds were: the giant metal cogs, sparks coming from the open electrical cables, the swaying of a light in the wind, wind coming through open windows and the rattling of a metal post.
Lastly, I also wanted to flesh out the ambience of the city in the distance. My plan was to enhance the sense of scale and bring life to the sounds of a city from afar.
After I had made all these notes, I began to create the sounds I would need to implement.
Ambience
With the assets made, it was time to implement them into the scene. I deleted all of the project’s original audio assets and emitters so I was left with a fresh environment to place my own.
I decided to implement the most prominent sounds first. This would give me a sonic canvas I could balance all the other sounds around. As the rain is a focal point to the level, I implemented the sounds for that first.
The main ambient bed for the rain was created with two emitters, playing different rain sounds that looped. They were placed in a way that they would be heard at maximum volume while outside in the environment, with the volume falling off as you entered a building. I didn’t want the rain to ever drop to silence, because you are never far away enough that you wouldn’t be able to hear it at any point in the scene.
Next came the wind. The goal here was to make the wind very directional, as if it was blowing in from the ocean side of the level. I positioned my wind emitters with this effect in mind and tweaked them until I was happy with the directionality. Getting the right balance between wind intensity and falloff took quite a bit of trial and error. But it was just a matter of moving the emitters, testing in the scene, and repeating until I was happy with the balance. I also used a general looping wind ambience bed that provided general coverage for the rest of the level.
The ocean waves crashing against the shore was another prominent feature. Because the animations for them were pretty intense, I wanted to make the fall off distance for their emitter quite large. But not so large you could hear it everywhere in the level. The audio emitters were placed almost directly above the waves, ensuring that they would sound loudest when directly near them. The falloff for the sound was again a mix of experimentation until I felt that it sounded natural.
With the wind, rain and ocean waves taken care of, it was time to tackle the more localised sounds.
Localised Audio Emitters
As mentioned before, I wanted to get pretty granular with my audio emitters - there was so much opportunity in the environment to add specific detail with audio and I wanted to take advantage of that.
First of all I located all the tarpaulin in the scene and added emitters to each of them that would represent the sound of the rain hitting the fabric. Additionally, I added an extra emitter that would play the sound of them ruffling in the wind to compliment the corresponding rustling animation.

Audio Emitters for the rain hitting the tarpaulin along with the sound of it rustling in the wind.

Next I placed the sounds for the neon signs. This was a simple loop with a fairly short falloff distance so they wouldn’t be too distracting.
I added an emitter for the wind blowing through the opening in the first corridor. This was a unique asset and a unique emitter which was very directionally focussed.
The level also contained huge spinning cogs. I placed my emitters directly on them and as they were so large, I gave them a medium to long falloff distance.
Another spot emitter that I placed was for the rattling of a metal post which moves in the wind. I made a random sound trigger blueprint (more details in the next section) and attached that to the post.
Lastly, I added spot emitters to all the smaller elements in the scene. This included: the sparks caused by the exposed wires, the steam pouring out of the pipes, water droplets leaking from the ceiling, and the swaying of the light in the starting corridor.
Random Sound Triggers Using Blueprints
I wanted to create a system similar to a random container in Wwise - a system where a group of sounds can be triggered randomly while assigning randomisation properties to them such as variations in pitch, volume and playback rate.
A system like this would add more realism to certain sounds. The first place I used this Blueprint was for randomising metal clanks of a metal post swaying in the wind.
Here’s what my Blueprint looks like in order to achieve this:

On the left are the audio files I wanted to be randomised. They are going into a Random component which will select one of the files to play at random. Then we have a Delay component. With this you can specify a minimum and maximum delay time for when the sound triggers. After this is a Lopping Component, which ensures the whole system will keep triggering over and over again while the player is near the emitter. Lastly, there is a Modulator, in which I have assigned some slight pitch and volume randomisation to each sound as it triggers.
I also used the same system to randomise the sounds for the Dog Barking and the swaying squeak of the light in the first corridor.
Audio Trigger Boxes
I wanted to use Trigger Boxes for two reasons: firstly, so I had an idea of how they worked and secondly, so I could add some one shot sounds to add interest to the level. I was keen to add at least one sound that wasn’t part of the level - one that was intended as a signifying sound for the player. Which, in this case, was an entering new area sound.
The other place I used a Trigger Box was on the balcony. I used it to trigger the sound of some sirens in the distance from the city. I didn’t want to attach the sirens to my main ambient city bed, as repeating sirens would make it sound unrealistic the longer you stood there. Using a Trigger Box ensured that it was a one off event.

The Audio Trigger box that initiates the plaback of the sirens
Footstep Playback System with BluePrints
The Soul City project does not come with a character model. So attaching footsteps sounds to a First Person Actor without any animations proved to be tricky. I wasn’t sure the best way to approach it, but luckily I came across an excellent tutorial on youtube which helped me get the results I wanted.

A Blueprint for First Person Footstep Sounds Trigger
Esentially, with this system, I am triggering the playback rate of the footstep sounds at a time interval when the first person actor moves. It required a lot of experimenting to get the timing of the triggering in line with the walking speed of the first person actor. But I soon got to a point where I thought it sounded pretty natural. The sounds of the footsteps are also getting randomly chosen each time.
This ended up being a pretty complicated way of achieving something so simple. The lack of animations for the first person actor Blueprint made it a challenge and I’m not convinced this is the best way to do it. But it works for the purposes of this demonstration. In future, I’d look at alternative ways of attaching footsteps to a First Person Actor.
The Mix
Note: The final mix is just for demonstration purposes - I’d never mix ambience this loud in a real game situation.
My overall aim was to make the weather feel powerful, like the level was in the beginning stages of a storm. I also tried to make the less important audio quieter, yet still able to be heard. Examples of these subtle sounds are the creaking of the swaying light in the corridor and the gentle hum of the neon signs throughout the level. Not sounds I wanted to necessarily draw the players attention too, but important nonetheless.
Wrapping it Up & What’s Next
This was a fun and useful exercise. I learnt a lot about the basics of implementing audio in Unreal with this project. I now have the confidence to attempt something more complex. For my next Unreal project I aim to have more elaborate audio systems and more complex events happening to trigger audio.
Do you need a freelance sound designer for your Unreal engine game? Contact me today to tell me about your project!
The Author
This article was written by Oliver Smith. A long-time remote working freelance sound designer dedicated to making gameplay enhancing sound for games.
Small Speakers, Big Impact: Maximizing Mobile Game Audio for Small Speakers.
In order to replicate the frequency response of mobile playback systems, I like to set up an EQ on my master with a high pass filter at around 800Hz, 400Hz and 200Hz (switching between them while reviwing work) to replicate the loss of those frequencies you’ll experience on mobile speakers.
A Guide for Sound Designers & Composers to Optimise their Audio for Mobile Speakers
As a freelance sound designer, I’ve worked on a number of mobile games and it hasn’t always been possible to review the audio on a native build before release. Because of this, and due to the nature of the playback system of the mobile platform - small phone speakers, it can represent a unique challenge in making sure the audio translates well to mobile devices.
According to this article by Touch Arcade, in 2013 only 3% of players worldwide were playing mobile games while using headphones. While not a reliable statistic now, the vast majority of people playing mobile games are still experiencing their game’s audio through phone speakers.
So it's vital we spend the time making sure our mobile game’s audio sounds great on mobile speakers. Especially if we are unable to test our audio on a mobile device before launch. But how can we do this?
The following tips have worked well for me and will help your mobile game’s sound translate better on mobile speakers than if you didn’t take into account the limitations of mobile speakers.
Does Sound Matter in Mobile Games?
It’s vitally important.
Sound can impart brand recognition with your game just as much as a logo, characters or artwork can.
Additionally, 73% of the people playing mobile games are playing with the sound on.
Making sure your mobile game’s audio sounds great will make your game more recognisable, fun and people will spend more time playing it.
As you can see, it’s important to get your mobile game’s audio to a high standard.
The Frequency Limitations of Small Speaker Systems.
Smaller speakers inherently have less of a frequency response than large speakers.
Here is an excellent blog post on the Audiokinetic website that goes into depth reporting the loudness and frequency response of popular smartphones. I’ll summarise some of the key takeaways here.
Mobile speakers tend to drop off at around 800Hz. This will vary from handset to handset, but as a general rule of thumb it’s a safe starting point to work with.
4-5kHz can be particularly pronounced on mobile handsets, so be extra careful with elements in this range. A build up in this frequency band will get fatiguing to listen to quickly - which could potentially result in people spending less time playing your game.
There is also high frequency falloff, but the amount varies depending on the handset. Some of the earliest fall off is at 10kHz.
Put together, this frequency profile is unique and limiting and we must keep it in mind if we are to effectively create audio for mobile games.
Preparation
Before even beginning to work on the sound effects or music for a mobile game, it would be worth reviewing the limitations of the playback system and planning your work accordingly.
For composers, it might be helpful to choose instrumentation that works well within the frequency profile of a mobile’s speaker system.
For sound designers, it could be useful to be thinking about working with more mono assets than you might normally.
Being mindful of the mobile platform from the start will make your audio translate better.
Simulating a Mobile Playback System inside your DAW
In order to replicate the frequency response of mobile playback systems, I like to set up an EQ on my master with a high pass filter at around 800Hz, 400Hz and 200Hz (switching between them while reviwing work) to replicate the loss of those frequencies you’ll experience on mobile speakers.
I will also boost between 4 and 5kHz by a few Db to simulate the sensitivity of that frequency band on mobile.
It might look something like this:

An EQ setup to replicate the frequency response of mobile speakers
Then, while I’m working on the sound effects for a mobile game, I’ll ocasionaly turn this EQ on to check my audio. I’ll be listening for things like: how much infomation gets lost - do some of my sounds need extra layers to sit within a certain frequency range to help them cut through? Also, how is my work affected by the loss of the low end - which will be substantial and will need addressing.
To account for the loss of low end when you try this approach, try subtle Distortion or Saturation to add upper harmonics to your bass and low end elements to help them become more audible in our limited frequency range.
If your audio still sounds good with this EQ on, you can be confident it will translate well on mobile.
Don’t forget to bypass it when rendering your work though.
Monitor at Lower Volume Levels
Low level listening will expose the sounds and elements of the mix that are either too loud or too quiet.
If your audio still has impact, definition and clarity at low levels, you can be confident that it will sound great on mobile speakers.
Check your Mix in Mono
This is good advice no matter what our intended playback system might be, but it’s doubly important for a mobile game’s audio.
Many mobile phone speakers are either mono or the speakers are so close together that they can appear to be mono from our perception.
If your work sounds good in mono, it will translate nicely to mobile speakers.
Takeaway
By now I’ve shown:
1. Audio for mobile games presents a unique set of challenges due to the limitations of small speakers and not always having access to a playable build on mobile to test on.
2. We can simulate the limitations of small speakers within our DAW to ensure our audio translates as well as possible.
3. By taking special care and being thoughtful in our approach, the mobile games we’re working on will sound great as a result.
I hope you’ve found this article useful.
Get in touch if you need professional sound design for your mobile game and want to take it’s audio to the next level. I’d love to hear about your project!
The Author
This article was written by Oliver Smith. A long-time remote working freelance sound designer dedicated to making gameplay enhancing sound for games.

In order to replicate the frequency response of mobile playback systems, I like to set up an EQ on my master with a high pass filter at around 800Hz, 400Hz and 200Hz (switching between them while reviwing work) to replicate the loss of those frequencies you’ll experience on mobile speakers.