
Your Custom Text Here
VR Combat Sound Design & Wwise Implementation — Case Study
Combat in Reave is physics-driven and player-controlled, meaning every swing, clash and impact must feel immediate and grounded. Because the player’s physical movement directly drives combat, the audio needed to reinforce weight, speed and contact precision without becoming repetitive or overwhelming in VR.
Challenges:
Variable swing speeds
Physics-based hit detection
Multiple surface types
Avoiding repetition fatigue
Maintaining clarity in 3D space
Performance constraints in VR
System Design in Wwise
Velocity-Driven Swing System
Each melee weapon’s swing intensity was driven by an RTPC mapped to weapon velocity, allowing audio layers to scale and trigger dynamically.
Higher-velocity swings introduced assets with sharper transients and additional high-frequency detail to reinforce perceived force. Medium swings triggered softer variants, while low-velocity movements produced no swing audio — preventing unnecessary noise during subtle weapon handling.
This ensured that audio feedback directly reflected player intent, strengthening physical embodiment within VR.
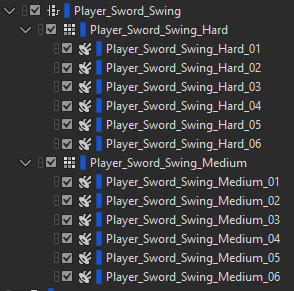
Wwise setup of the Switch Container containing the assets for two different swing strengths: Hard & Medium
Impact Triggering & Material Switching
Impacts were designed as layered, bespoke recordings and triggered as singular events.
Surface-based switch containers provided material-specific variation across seven distinct surface types. Random containers were used to reduce repetition during extended combat encounters.
In addition to surface type, impact intensity was categorised as soft, medium or hard. Rather than scaling a single asset via RTPCs, I recorded distinct impact recordings at each velocity level. Metal objects resonate and respond differently depending on strike force, and capturing those behaviors authentically produced significantly more convincing results.
Although this approach required extensive original recording, it introduced a level of physicality and realism that procedural scaling alone could not achieve.
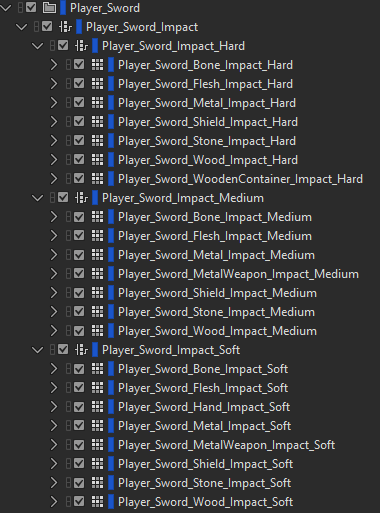
The Wwise Switch container with all the assets for 3 Impact Strengths: Soft, Medium & Hard. Across 7 different surface types.
VR Considerations
In VR, spatial clarity and mix definition are essential.
Voice limiting and prioritization ensured that critical combat feedback remained intelligible, even during multi-enemy encounters typical of Reave’s extraction gameplay. Standard mix-ducking techniques were implemented to preserve weapon presence while maintaining overall scene clarity.
The system was built to remain responsive without contributing to fatigue or audio clutter — a key consideration in extended VR sessions, where user comfort always has to be taken into account.
Why It Was Designed This Way
The goal of this system was to maximize weapon responsiveness and reinforce the physicality of VR combat.
By mapping swing velocity directly to audio behavior and capturing distinct impact recordings across multiple intensity levels, the system responds naturally to player input. This strengthens immersion and ensures that combat feels weighty and responsive rather than just cosmetic.
The structure was also designed to be scalable, allowing consistent behavior across multiple weapon types while maintaining performance stability within VR.
If you’re looking for an experienced freelance game sound designer to design and implement scalable audio systems, feel free to get in touch.
Sound Design for an ARPG - Wolcen: Lords of Mayhem
I wanted to share a bit about my process of designing and implementing sounds for mobs in an Action Role Playing Game (ARPG) like Wolcen: Lords of Mayhem.
Sound Design for an Action Role Playing Game
As a freelance sound designer, I had lots of fun working on Wolcen’s Act IV. A significant portion of my work was designing and implementing sounds for 15 brand new enemy mobs. I was also trusted with designing the audio for the final boss of the game. So I wanted to share a little about my process of designing and implementing sounds for mobs for an Action Role Playing Game (ARPG) like Wolcen: Lords of Mayhem.

Mob Categories
Mobs in Wolcen are typically divided into two categories: trash mobs and elite mobs. Trash mobs are the weakest enemies in the game. They are not very threatening by themselves but often appear in large numbers. Which has a bearing on sound design decisions, which I’ll discuss in more depth further on. These mobs are essentially canon fodder. The player can often obliterate whole swathes of these enemies with little effort. Therefore their sounds needed to be approached in a way that would convey and acknowledge these factors. Generally, I’d make sounds of a short duration without long tails. Because they spawn in such large numbers, the frequency of their attacks in groups can be considerable. It was therefore important to make their sounds short and to the point.
Elite mobs, on the other hand, are more impressive, physically larger and more threatening to the player. They appear in smaller numbers, but have more elaborate visual effects on their attacks and abilities and do more damage. The sounds for the elite enemies therefore needed to be more impressive to match their stature. Because of this I could make sounds for the elite mobs more imposing, detailed and with longer tails. They could take up more sonic space.

An example of an elite mob attack - the large circular fire explosion
Pre-Attack Sounds
Pre-attack sounds usually are triggered at the start of an attack’s animation. Trash mobs usually don’t have a pre-attack sound. Their attacks are commonly low damage and therefore low priority for the player. As they are not normally a serious threat to the player, pre-attack sounds for them would be redundant and clog up the audio mix space that could better be saved for more important audio cues.
Such as Elite mob’s pre-attack sounds, for example. Most of the elite mobs that I worked on have a pre-attack sound. Because they are much more threatening than trash mobs, it provides a useful audible warning indicator to the player when they are about to launch an attack. Which can give them time to avoid the attack by dodging or using a defensive ability. In essence, it gives the player a chance to respond to the attack by listening to the audio cue.
Imparting Identity and Lore with Sound

Concept Art for two of the mobs I worked on: The Spectre Mage and the Republic Golgoth Flamethrower
In addition to informing the player of imminent attacks, the sound design of the mobs could also impart a lot of their characteristics and lore to the player. Wolcen’s world and story has a lot of lore behind it, which plays a big part of the game. Nearly all mobs in Wolcen are grouped into different in-world game factions. The lore behind these factions helped guide the direction for their sonic palettes.
Republic mobs tend to have good equipment and are technologically advanced compared to other factions. I emphasized this by using lots of mechanical and electrical sounds that power some of their weapons and armored suits. Some of the weapons they wield include rifles, gatling guns and flamethrowers.
The Cult of Souls are an undead faction made up of various skeletons and specters. Many of their skills are based around frost, ice and soul magic. Including frost and ice in their precast sounds would therefore help indicate to the player what kind of elemental attack would be heading their way. If they were hit by one of these frost attacks they would potentially be frozen for a short duration. I also recorded my voice to create breathy sounds that were used as building block elements for their soul magic attacks.

One of my Reaper sessions for a Cult of Souls Mob - The Soul Casket
I also tried to utilize sound to inform the player about the quality of a particular mob’s weapons and equipment. For example, the Spectre Lancer was wielding a very flimsy looking spear. So I made sure my sound design conveyed this by choosing rougher, blunter metal sounds and not using smooth, resonant shing sounds - which tend to convey sharp, well kept blades.
Audio Implementation with Wwise and CryEngine
During implementation it was very important to limit the voices of mob attacks and skills that had a high rate of fire. Not doing this could lead to machine gun-like effects of certain sounds triggering repeatedly during gameplay. Which is extremely undesirable. Becoming not only annoying for the player to listen to, but clogging up the audio mix in an undesirable manner and potentially masking other important game audio.
Creating variations of the mob attacks and skills was important. I strived to create variations that walked the line of being different enough to avoid the repetitive nature of a frequently cast attack or skill, but not being so different that the player could still identify each attack or skill from the familiar sound that it made. Generally speaking, trash mobs had more variations than elite mobs because of their faster rate of attacking.
The general process of implementation went like this. Firstly, I’d set up my sounds in Wwise. Paying careful attention to the randomisation parameters, attenuations and limiting of voices. Audio levels were roughly set at this stage. The final mixing of these would come later. After I had a chance to test my sounds in the game and iterate upon them until we were happy with them.
Next, using the Cryengine Audio editor, I would create audio events and link these events to the ones I had created in Wwise. Put simply, the CryEngine audio event called to the corresponding Wwise event.
Once these events were set up, implementation in CryEngine usually happened via one of three ways. The first, and most straightforward, was putting the events trigger for my sounds in the XML file of a particular mob. Each mob had an XML file that determined most of their game data.
There are many predefined ways to trigger a sound using this method, like OnAnimStart (which would trigger a sound at the start of an animation) and OnAnimCast (which would trigger a sound on the ‘cast’ portion of a particular skill or projectile). I believe these, and other parameters were created internally for Wolcen for the audio functionality we required.
The second way I implemented mob sounds was attaching a sound directly to an animation using CryEngine’s Animation Events. This was sometimes necessary to do when precise timing was required or when the XML method was not meeting our requirements for one reason or another. Implementing in this way allows you to scrub through an animation frame by frame and attach a sound precisely where you want it to trigger. I used this method quite a lot. It allowed a lot of flexibility in attaching sounds on a very granular level which increased the detail I could achieve. This was particularly helpful for elite mobs which had elaborate, extensive and multipart skills.
The third main way I implemented sounds was via particle effects. This allowed me to attach my sounds directly to the particle effects used by a mob’s attack or ability. A sound could be triggered by any of the layers in a particle effect, allowing for fine control over sound. For example, I could attach a fire sound directly to the fire layer in the visual effects. Which would allow for precise control over that sound’s triggering and duration. We might want a fire sound to fizzle out when the fire dies, yet there are still visual effects for smoke for example. This would ensure that our fire sound stops once the fire visual effect has been destroyed. This method of implementation was often used for the damaging portion of a skill - when a mob’s skill hits the player character directly.
Sometimes, there came a situation where none of those methods of implementation would suffice. Sometimes I would come across a situation which would require programmer support. This was the case for the Electric Fences created by one of the Republic Golgoth’s Flamerthrower abilities. This skill created a new game object in the world - an electric fence that could entrap the player. Because this skill created a new entity without an XML file, or other parameters I could easily modify, I had to work with a programmer to implement my sounds directly via code. This was quite a rare occasion though.
I had a great time working on the mobs for Wolcen’s Act IV. Because I had such control over the implementation of my sounds, it really made me think about implementation first. Which informed how I approached my designs before I even started them. I also got intimately familiar with how implementing audio works with CryEngine.
Do you need an experienced sound designer for your next RPG or action game? Get in touch and tell me about your project today!
The Author
This article was written by Oliver Smith. A long-time remote working freelance sound designer dedicated to making gameplay enhancing sound for games.

Unreal Engine Audio Implementation Demo: Soul City
The goal of this project was to start to learn how to implement audio inside the Unreal Engine. I specifically didn’t want to use middleware for this, so I could get a handle on Unreal’s native audio tools without relying on the familiarity of using something like Wwise. I also wanted to get to grips with Blueprints and see how I could apply them to some of the audio systems.
The level I used for this showcase was the free Soul City project from Epic Games.
All of the audio was designed and exported for implementation using Reaper.
I’m documenting this mainly as a reference for myself. But if it aids anyone else that would be great.

Planning
After opening the project for the first time, the first thing that I did was to play through the scene a few times to get a feel for what kinds of sounds the environment would require.
As the project already contained audio, this was pretty easy for the most part. But I also spotted some areas where I thought I could add some more detail and make it my own - rather than just copying what the sound designers had done in the original project.
As rain is such a predominant part of the scene, I wanted to add as much detail as I could with it. I made a note of the different surfaces the rain was falling on, like the tarpaulin and the corrugated iron roofs and planned to add emitters for both of these surfaces.
There was also an abundance of neon signs placed around the level, so I could add a gentle hum to these. One was even flickering near the end of the scene, so I wanted to add a unique sound for that one.
I also aimed to add a bit of extra life to the scene. I had the idea to add a dog barking when you walked close to one of the apartments in the level. It would help to give the impression that this was an area that was lived in.
Some of the other elements in the level that would require sounds were: the giant metal cogs, sparks coming from the open electrical cables, the swaying of a light in the wind, wind coming through open windows and the rattling of a metal post.
Lastly, I also wanted to flesh out the ambience of the city in the distance. My plan was to enhance the sense of scale and bring life to the sounds of a city from afar.
After I had made all these notes, I began to create the sounds I would need to implement.
Ambience
With the assets made, it was time to implement them into the scene. I deleted all of the project’s original audio assets and emitters so I was left with a fresh environment to place my own.
I decided to implement the most prominent sounds first. This would give me a sonic canvas I could balance all the other sounds around. As the rain is a focal point to the level, I implemented the sounds for that first.
The main ambient bed for the rain was created with two emitters, playing different rain sounds that looped. They were placed in a way that they would be heard at maximum volume while outside in the environment, with the volume falling off as you entered a building. I didn’t want the rain to ever drop to silence, because you are never far away enough that you wouldn’t be able to hear it at any point in the scene.
Next came the wind. The goal here was to make the wind very directional, as if it was blowing in from the ocean side of the level. I positioned my wind emitters with this effect in mind and tweaked them until I was happy with the directionality. Getting the right balance between wind intensity and falloff took quite a bit of trial and error. But it was just a matter of moving the emitters, testing in the scene, and repeating until I was happy with the balance. I also used a general looping wind ambience bed that provided general coverage for the rest of the level.
The ocean waves crashing against the shore was another prominent feature. Because the animations for them were pretty intense, I wanted to make the fall off distance for their emitter quite large. But not so large you could hear it everywhere in the level. The audio emitters were placed almost directly above the waves, ensuring that they would sound loudest when directly near them. The falloff for the sound was again a mix of experimentation until I felt that it sounded natural.
With the wind, rain and ocean waves taken care of, it was time to tackle the more localised sounds.
Localised Audio Emitters
As mentioned before, I wanted to get pretty granular with my audio emitters - there was so much opportunity in the environment to add specific detail with audio and I wanted to take advantage of that.
First of all I located all the tarpaulin in the scene and added emitters to each of them that would represent the sound of the rain hitting the fabric. Additionally, I added an extra emitter that would play the sound of them ruffling in the wind to compliment the corresponding rustling animation.

Audio Emitters for the rain hitting the tarpaulin along with the sound of it rustling in the wind.

Next I placed the sounds for the neon signs. This was a simple loop with a fairly short falloff distance so they wouldn’t be too distracting.
I added an emitter for the wind blowing through the opening in the first corridor. This was a unique asset and a unique emitter which was very directionally focussed.
The level also contained huge spinning cogs. I placed my emitters directly on them and as they were so large, I gave them a medium to long falloff distance.
Another spot emitter that I placed was for the rattling of a metal post which moves in the wind. I made a random sound trigger blueprint (more details in the next section) and attached that to the post.
Lastly, I added spot emitters to all the smaller elements in the scene. This included: the sparks caused by the exposed wires, the steam pouring out of the pipes, water droplets leaking from the ceiling, and the swaying of the light in the starting corridor.
Random Sound Triggers Using Blueprints
I wanted to create a system similar to a random container in Wwise - a system where a group of sounds can be triggered randomly while assigning randomisation properties to them such as variations in pitch, volume and playback rate.
A system like this would add more realism to certain sounds. The first place I used this Blueprint was for randomising metal clanks of a metal post swaying in the wind.
Here’s what my Blueprint looks like in order to achieve this:

On the left are the audio files I wanted to be randomised. They are going into a Random component which will select one of the files to play at random. Then we have a Delay component. With this you can specify a minimum and maximum delay time for when the sound triggers. After this is a Lopping Component, which ensures the whole system will keep triggering over and over again while the player is near the emitter. Lastly, there is a Modulator, in which I have assigned some slight pitch and volume randomisation to each sound as it triggers.
I also used the same system to randomise the sounds for the Dog Barking and the swaying squeak of the light in the first corridor.
Audio Trigger Boxes
I wanted to use Trigger Boxes for two reasons: firstly, so I had an idea of how they worked and secondly, so I could add some one shot sounds to add interest to the level. I was keen to add at least one sound that wasn’t part of the level - one that was intended as a signifying sound for the player. Which, in this case, was an entering new area sound.
The other place I used a Trigger Box was on the balcony. I used it to trigger the sound of some sirens in the distance from the city. I didn’t want to attach the sirens to my main ambient city bed, as repeating sirens would make it sound unrealistic the longer you stood there. Using a Trigger Box ensured that it was a one off event.

The Audio Trigger box that initiates the plaback of the sirens
Footstep Playback System with BluePrints
The Soul City project does not come with a character model. So attaching footsteps sounds to a First Person Actor without any animations proved to be tricky. I wasn’t sure the best way to approach it, but luckily I came across an excellent tutorial on youtube which helped me get the results I wanted.

A Blueprint for First Person Footstep Sounds Trigger
Esentially, with this system, I am triggering the playback rate of the footstep sounds at a time interval when the first person actor moves. It required a lot of experimenting to get the timing of the triggering in line with the walking speed of the first person actor. But I soon got to a point where I thought it sounded pretty natural. The sounds of the footsteps are also getting randomly chosen each time.
This ended up being a pretty complicated way of achieving something so simple. The lack of animations for the first person actor Blueprint made it a challenge and I’m not convinced this is the best way to do it. But it works for the purposes of this demonstration. In future, I’d look at alternative ways of attaching footsteps to a First Person Actor.
The Mix
Note: The final mix is just for demonstration purposes - I’d never mix ambience this loud in a real game situation.
My overall aim was to make the weather feel powerful, like the level was in the beginning stages of a storm. I also tried to make the less important audio quieter, yet still able to be heard. Examples of these subtle sounds are the creaking of the swaying light in the corridor and the gentle hum of the neon signs throughout the level. Not sounds I wanted to necessarily draw the players attention too, but important nonetheless.
Wrapping it Up & What’s Next
This was a fun and useful exercise. I learnt a lot about the basics of implementing audio in Unreal with this project. I now have the confidence to attempt something more complex. For my next Unreal project I aim to have more elaborate audio systems and more complex events happening to trigger audio.
Do you need a freelance sound designer for your Unreal engine game? Contact me today to tell me about your project!
The Author
This article was written by Oliver Smith. A long-time remote working freelance sound designer dedicated to making gameplay enhancing sound for games.